CyanogenMod
CyanogenMod (pronounced sigh-AN-oh-jen-mod), is a customized, aftermarket firmware distribution for several Android devices. Based on the Android Open Source Project, CyanogenMod is designed to increase performance and reliability over Android-based ROMs released by vendors and carriers such as Google, T-Mobile, HTC, etc. CyanogenMod also offers a variety of features & enhancements that are not currently found in these versions of Android.
The main advantages over the device manufacturers original firmware (often called stock ROM) are …
Monthly updates.
Latest Android releases.
Security fixes and updates.
No software clutter from device manufacturer.
Google software and services are optional.
Privacy enhancements.
There is one disadvantage:
Your device warranty with the manufacturer may be voided.
Supported Devices
On the Devices page in the CyanogenMod Wiki you can check if your Android device is supported.
Desktop Software
Install the following software from the Ubuntu software repository on your Ubuntu desktop computer, to prepare the CyanogenMod installation to your device.
Heimdall Flash to transfer and install firmware images (flash) to the Android device.
Android Debug Bridge to manage the Android device, while connected over over USB-cable.
Android Software Development Kit
Although the Android Debug Bridge (ADB) is available from the Ubuntu Software repository, it is outdated and won’t work with current Android versions.
If any previous version of ADB has been installed from the Ubuntu Software repository it should be uninstalled first:
$ sudo apt-get remove android-tools-adb
Android Debug Bridge (ADB) is part of the Android SDK published by Google.
To install ADB we need to download the Android SDK.
Got to the page Installing the Android SDK
Click on the Button STAND-ALONE SDK TOOLS
Click on the link download the SDK now
Click on the link android-sdk_r24.4.1-linux.tgz
A page displaying terms and conditions is displayed, click on the “I have read and agree…” box.
Click the download link DOWNLOAD ANDROID-SDK …
$ cd ~/Downloads
$ wget http://dl.google.com/android/android-sdk_r24.4.1-linux.tgz
$ mkdir -p Android
$ cd Android
$ tar -xzf ../android-sdk_r24.4.1-linux.tgz
$ cd android-sdk-linux/tools
$ ./android sdk
The Java application Android SDK Manager will be started where you can choose items to be installed or updated:
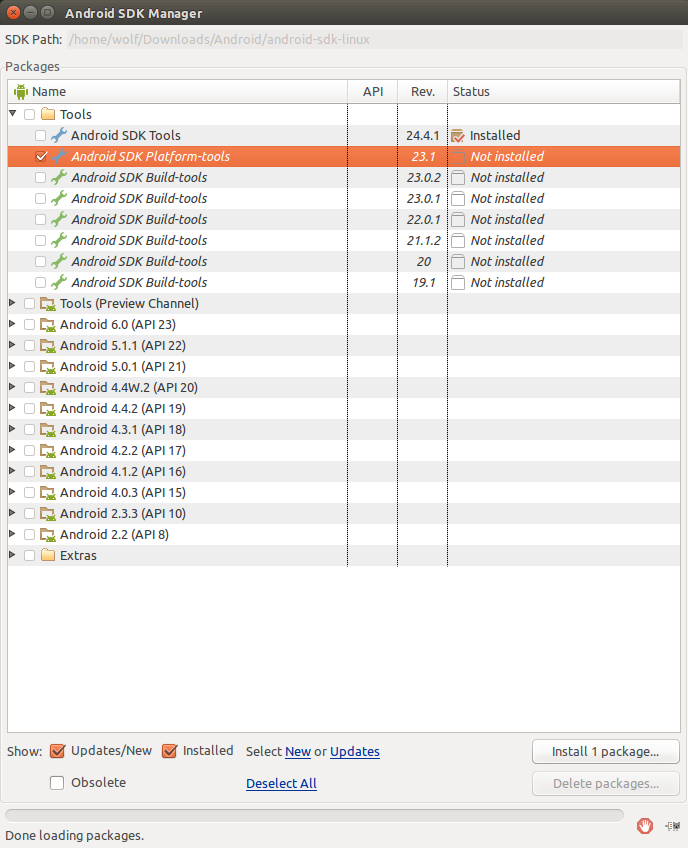
Deselect all except the Android SDK Platform-tools.
Click on the Install 1 package… button.
Accept the license agreement on the next page.
adb can now be started from ~/Downloads/Android/android-sdk-linux/platform-tools/adb.
Since this is not very convenient we make a copy in /usr/bin:
$ sudo cp ~/Downloads/Android/android-sdk-linux/platform-tools/adb /usr/bin
Preparations
You need several things ready on your desktop computer.
Recovery Image
The recovery image is a special small firmware with limited capabilities. It is needed to install and update the full Android system software, as this can’t be done while Android is already running. It is therefore installed in a separate small partition beneath the Android system.
Like the CyanogenMod firmware you need the recovery image tailored to your device.
The following example is for Samsung Galaxy S4 LTE international (jfltexx) and CyanogenMod 12.1 (Android 5.1):
$ cd ~/Downloads
$ mkdir -p Android/jfltexx/CM/12.1
$ cd  ~/Downloads/Android/jfltexx/CM/12.1
$ wget https://download.cyanogenmod.org/get/jfltexx-snapshot-recovery.img
$ sha1sum cm-12.1-20151117-SNAPSHOT-YOG7DAO1JN-jfltexx-recovery.img.sha1 | grep 4f5b9ab254a16a4481a35984298f424bd77c56eb
Firmware Image
The CyanogenMod firmware image must have been built to match your device exactly.
The following example is for Samsung Galaxy S4 LTE international (jfltexx) and CyanogenMod 12.1 (Android 5.1):
$ cd ~/Downloads/Android/jfltexx/CM/12.1
$ wget https://download.cyanogenmod.org/get/jfltexx-snapshot.zip
$ sha1sum cm-12.1-20151117-SNAPSHOT-YOG7DAO1JN-jfltexx.zip | grep 2f4842a2495176499489f0ba083bafa7c23cfc81
Optional Google Apps Image
CyanogenMod runs perfectly well without any of the usual Google apps. And with the features described in this guide, there is absolutely nothing you should miss, that Google provides with its various services.
However, if you have already bought 3rd-party Android apps at the Google Play store, you will not be able to install them or run them, since their license can not be verified by Goggle without your personal registration with Google Play store.
So if you still need Google apps and services, you need to download the package relevant to the Android version installed.
The following example is for CyanogenMod 12.1 (Android 5.1):
$ cd ~/Downloads/Android/jfltexx/CM/12.1
$ wget https://github.com/opengapps/arm/releases/download/20151225/open_gapps-arm-5.1-nano-20151225.zip
$ wget https://github.com/opengapps/arm/releases/download/20151225/open_gapps-arm-5.1-nano-20151225.zip.md5
$ md5sum -c open_gapps-arm-5.1-nano-20151225.zip.md5
Fully charged Android Device
As usual, you don’t want your device to shut down on the middle of a system update.
Install Recovery Image
Shut down your phone and disconnect any USB cable
Press and hold the Volume Down + Home + Power buttons simultaneously until the display turns on.
Confirm the download warning message
$ cd ~/Downloads/Android/jfltexx/CM/12.1
$ heimdall flash --verbose --no-reboot \
        --RECOVERY cm-12.1-20151117-SNAPSHOT-YOG7DAO1JN-jfltexx-recovery.img
The -no-reboot options is important. Without it, the phone will automatically reboot after the flash has completed, but by doing so the the boot process will notice a changed recovery image and restore the original one.
After the flash has completed, shut down the phone and restart it immediately in recovery mode, by pressing and holding the Volume Up + Home + Power buttons simultaneously until the display turns on.
Install Firmware
Shut down your phone and disconnect any USB cable
Press and hold the Volume Up + Home + Power buttons simultaneously until the display turns on.
The CyanogenMod recovery menu will be displayed. You can navigate by touch or the volume up and down buttons.
Select Apply update
Select Apply from ADB
The Cancel sideload option is displayed, which means the device is waiting to receive firmware updates over USB.
Connect the phone to your desktop by USB cable.
Transfer the firmware package using the following commands.
$ cd ~/Downloads/Android/jfltexx/CM/12.1
$ adb sideload cm-12.1-20151117-SNAPSHOT-YOG7DAO1JN-jfltexx.zip