Tor Relay
The Tor network relies on volunteers to donate bandwidth. The more people who run relays, the faster the Tor network will be.
If you have at least 2 megabits per second for both upload and download, you can help out Tor by configuring your Tor to be a relay too.
Warning
Its not advised to run a Tor Exit Node on Internet connections used for other tasks like providing mail and web services or surfing the web etc. This guide describes the setup of a non-exit-Relay.
Prerequisites
IP Address
Add IPv4 and IPV6 network addresses for the Tor relay:
$ sudo ip addr add 192.0.2.49/24 dev eth0
$ sudo ip addr add 2001:db8::49/64 dev eth0
Also add them to the file /etc/network/interfaces to make them
persistent across system restarts:
# tor-relay.example.net
iface eth0 inet static
    address 192.0.2.49/24
iface eth0 inet6 static
    address 2001:db8::49/64
DNS Records
Name |
Type |
Content |
Priority |
TTL |
|---|---|---|---|---|
tor-relay |
A |
300 |
||
tor-relay |
AAAA |
Check the “Add also reverse record” when adding the IPv6 entry.
Firewall Rules
IPv4 NAT port forwarding:
Protocol |
Port No. |
Forward To |
Description |
|---|---|---|---|
TCP |
110, 9001 |
Incoming Tor connections |
|
TCP |
995, 9030 |
Incoming Tor directory connections |
Allowed IPv6 connections:
Protocol |
Port No. |
Destination |
Description |
|---|---|---|---|
TCP |
110, 9001 |
Incoming Tor connections |
|
TCP |
995, 9030 |
Incoming Tor directory connections |
Service Files
Stop any running tor services:
$ sudo service tor stop
Create copies of the installed Tor init.d script, service defaults:
SysV Init Script
$ sudo cp /etc/init.d/tor /etc/init.d/tor-relay
Change the copied file
/etc/init.d/tor-relay as follows:
 1#! /bin/bash
 2
 3### BEGIN INIT INFO
 4# Provides:          tor-relay
 5# Required-Start:    $local_fs $remote_fs $network $named $time
 6# Required-Stop:     $local_fs $remote_fs $network $named $time
 7# Should-Start:      $syslog
 8# Should-Stop:       $syslog
 9# Default-Start:     2 3 4 5
10# Default-Stop:      0 1 6
11# Short-Description: Starts The Onion Router daemon processes
12# Description:       Start The Onion Router, a TCP overlay
13#                    network client that provides anonymous
14#                    transport.
15### END INIT INFO
16
17# Load the VERBOSE setting and other rcS variables
18. /lib/init/vars.sh
19
20# Define LSB log_* functions.
21. /lib/lsb/init-functions
22
23PATH=/sbin:/bin:/usr/sbin:/usr/bin
24DAEMON=/usr/bin/tor
25NAME=tor-relay
26DESC="tor relay daemon"
27TORLOGDIR=/var/log/tor
28TORPIDDIR=/var/run/tor-relay
29TORPID=$TORPIDDIR/tor-relay.pid
30DEFAULTSFILE=/etc/default/$NAME
31WAITFORDAEMON=60
32DEFAULT_ARGS="-f /etc/tor/tor-relay --defaults-torrc /usr/share/tor/tor-service-defaults-torrc"
33VERIFY_ARGS="--verify-config $DEFAULT_ARGS"
34USE_AA_EXEC="yes"
35ARGS=""
SysV Defaults
$ sudo cp /etc/default/tor /etc/default/tor-relay
AppArmor Profile
Change the file
/etc/apparmor.d/local/system_tor
as follows:
1# Site-specific additions and overrides for system_tor.
2# For more details, please see /etc/apparmor.d/local/README.
3
4  owner /var/lib/tor-relay/** rwk,
5
6  /{,var/}run/tor-relay/control w,
7  /{,var/}run/tor-relay/tor-relay.pid w,
8  /{,var/}run/tor-relay/control.authcookie w,
9  /{,var/}run/tor-relay/control.authcookie.tmp rw,
Make AppArmor re-read its configuration to activate the new profile:
$ sudo service apparmor recache
$ sudo service apparmor restart
Data Directory
$ sudo -u debian-tor mkdir /var/lib/tor-relay
Tor Relay Configuration
Configuration is stored in the file
/etc/tor/tor-relay.
See man tor or the
Tor-stable manual
for reference of all possible configuration options.
 1#
 2# Tor Relay Configuration
 3#
 4
 5# Store working data in DIR (Default: /var/lib/tor)
 6DataDirectory /var/lib/tor-relay
 7
 8# On startup, write our PID to FILE. On clean shutdown, remove FILE.
 9PidFile /var/run/tor/tor-relay.pid
10
11# Send all messages of level 'notice' or higher to /var/log/tor/tor-relay.log
12Log notice file /var/log/tor/tor-relay.log
13
14# Unix domain socket for control connections
15ControlSocket /var/run/tor-relay/control
16
17# TCP control port for control connections
18ControlPort 9051
19
20# Location and file name for Tor’s cookie file
21CookieAuthFile /var/run/tor-relay/control.authcookie
22
23# Password authentication for control connections
24HashedControlPassword 16:7B79E57C592CE09660D745F88A1317263BB43CE09FBA46CBF31C6C13B0
25
26# Identity of the relay
27Nickname RollUrown
28
29# Contact Information (will be published)
30ContactInfo tormaster <tormaster AT example dot com>
31
32# Advertised DNS host name
33Address tor-relay.example.net
34ORPort	tor-relay.example.net:110 NoListen
35DirPort tor-relay.example.net:995 NoListen
36
37# IPv4 private address (port-forwarded from NAT firewall/router)
38OutboundBindAddress 192.0.2.49
39ORPort	192.0.2.49:110 NoAdvertise
40DirPort 192.0.2.49:995 NoAdvertise
41
42# IPv6 global address
43OutboundBindAddress 2001:db8::49
44ORPort	[2001:db8::49]:110 NoAdvertise
45DirPort [2001:db8::49]:995 NoAdvertise
46
47# Traffic Limits
48RelayBandwidthRate 50 MBits
49RelayBandwidthBurst 100 MBits
50
51# Exit policy
52ExitPolicy reject *:* # Reject everything
53
54# Disable local Tor client connections
55SocksPort 0
56
57# Needed by tor-arm for statistics
58DisableDebuggerAttachment 0
Control Connection Password
Create a secure password with KeePassX or Diceware that doesn’t contain any symbols, special characters or whitespace.
Then let Tor create and display a hash of your password for as follows:
$ tor --hush --hash-password ********
16:7B79E57C592CE09660D745F88A1317263BB43CE09FBA46CBF31C6C13B0
$ history -c
The second command clears your command-line history, as it contains your password in clear-text.
Bandwidth Limits
Decide on how much bandwidth of your Internet connection you would like to donate to the Tor network.
See the Rate Limiting FAQ entry on the Tor project website.
Make sure to use the right unit. Limits can be defined as bytes, KBytes, MBytes, GBytes or as KBits, MBits and GBits.
Contact Information
Think of a name for your relay and also create a mail address (or mail alias) and a GPG key. So that you can be contacted by the Tor project. The mail address will be published on Tor related websites, so you might not want to use your regular personal mail address.
Verify Configuration
$ sudo -u debian-tor tor -f /etc/tor/tor-relay --verify-config --hush
Start the Relay Server
$ sudo service tor restart
It can take up to an hour until your new relay is visible on the Tor network. Check the Tor Atlas or Tor Globe websites to see the current status of your relay.
It will take several days until your new relay starts picking up traffic. Read The lifecycle of a new relay about how and why.
Monitoring the Relay
Nyx (previously known as arm) is a command-line monitor for Tor. With this you can get detailed real-time information about your relay such as bandwidth usage, connections, logs, and much more:
Bandwidth Graph;
Event Log;
Connections;
Configuration Editor:
Torrc;
Interpreter;
… and more!
Installation
Install Nyx:
$ sudo pip install nyx
Configuration
Like many terminal applications Nyx can be customized through a configuration
file. By default ~/.nyx/nyxrc, though you can specify one with nyx
“–config /path/to/nyxrc”.
$ mkdir ~/.nyx
$ echo 'show_bits true' >> ~/.nyx/config
$ sudo chown -R _tor-relay ~/.nyx
Running Nyx
Nyx needs access to the Tor socket file /run/tor-instances/relay/control
it is therefore best run as the Tor user:
$ sudo -u _tor-relay /usr/local/bin/nyx --socket /run/tor-instances/relay/control
Web Interface for Tor Relays
The Onion Box is a web based status monitor for Tor relays.
It provides a web interface to connect to a Tor relay and monitor aspects of it’s operation in real time.
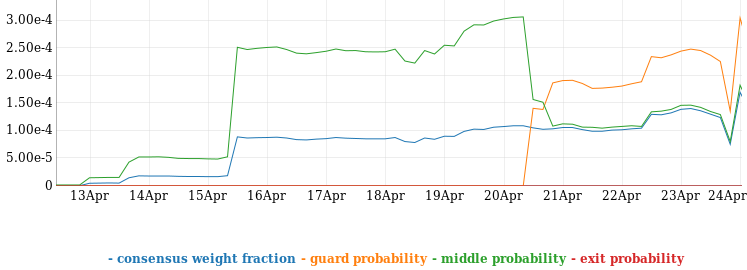
Additionally it fetches long term statistical data, like bandwidth, consensus weight and probability of middle, guard, exit node probability about your node from Onionoo, the Tor network status protocol.
The Onion Box is written in Python.
Prerequisites
$ sudo apt install virtualenv
Installation
Download the app:
$ cd /usr/local/src/
$ git clone --no-checkout https://github.com/ralphwetzel/theonionbox.git
$ cd theonionbox
$ git tag
v3.0.1
v3.0.2
v3.0.3
$ git checkout v3.0.3
Create a virtual environment for the Python application and activate it:
$ sudo -su theonionbox
$ virtualenv tobenv
$ source tobenv/bin/activate
Setup and install:
(tobenv)$ tobenv/bin/pip install --no-cache-dir apscheduler requests PySocks six
(tobenv)$ tobenv/bin/python ./setup.py build
(tobenv)$ tobenv/bin/python ./setup.py install
Configuration
Create and edit the file
/usr/local/lib/theonionbox/theonionbox/config/theonionbox.cfg:
[config]
## v4.0 will only support version = 2
protocol = 2

[TheOnionBox]
host = 127.0.0.49
port = 8080
message_level = DEBUG

[Tor]
control = socket
socket = /run/tor-instances/relay/control
ttl = -1
tor_preserve_ERR = yes
tor_preserve_WARN = yes
tor_preserve_NOTICE = yes

[MyRelay]
control = socket
host = tor-relay.example.net
socket = /run/tor-instances/relay/control
nick = <Nickname of you relay>
fp = <$Fingerprint of you relay>
Alternatively you can copy the sample file
theonionbox/config/theonionbox.example.
Test
(tobenv)$ tobenv/bin/python theonionbox/theonionbox.py
        19:20:58.538 The Onion Box: WebInterface to monitor your Tor operations.
        19:20:58.540 Version v4.0.0rc1 (stamp 20171102|221357)
        19:20:58.549 Operating with configuration from 'config/theonionbox.cfg'
        19:20:58.678 Temperature sensor information located in file system. Expect to get a chart!
        19:20:58.678 Uptime information located. Expect to get a readout!
        19:21:08.785 Ready to listen on http://127.0.0.49:8080/
Use CTRL-C to terminate.
Systemd Service
Create /etc/systemd/theonionbox.service:
# Run The Onion Box as background service
# https://github.com/ralphwetzel/theonionbox/

[Unit]
Description=The Onion Box
Documentation=https://github.com/ralphwetzel/theonionbox/wiki
After=network.target

[Service]
Type=simple
User=theonionbox
WorkingDirectory=/usr/local/lib/theonionbox/theonionbox/
ExecStart=/usr/local/lib/theonionbox/tobenv/bin/python /usr/local/lib/theonionbox/theonionbox/theonionbox.py --mode=service
Restart=on-failure

[Install]
WantedBy=multi-user.target
Reload Systemd:
$ sudo systemctl --daemon-reload
Start the service:
$ sudo systemctl start theonionbox.service
Update
Activate the virtual environment for the Python application:
$ cd /usr/local/lib/theonionbox
$ sudo -Hsu theonionbox
$ source tobenv/bin/activate
Upgrade the app:
(tobenv)$ sudo git fetch --tags
v3.0.1
v3.0.2
v3.0.3
v3.1.0
v3.1.1
v4.0.0
(tobenv)$ git checkout v4.0.0
Upgrade Python packages:
(tobenv)$ pip --no-cache-dir install --upgrade pscheduler requests PySocks six
Rebuild and re-install:
(tobenv)$ tobenv/bin/python ./setup.py build
(tobenv)$ tobenv/bin/python ./setup.py install
(tobenv)$ exit
$ exit
Restart:
$ sudo systemctl restart theonionbox.service
Backup Considerations
Tor Node Identity
Tor nodes are referred to by name and or fingerprint. The name can be anything
and its not sure if its unique. It just a help for humans to refer to. The
fingerprint is unique and tied to the private RSA identity key. The fingerprint
is store along the name in the file /var/lib/tor/fingerprint.
The Tor identity key in the file /var/lib/tor/keys/secret_id_key is the
one who identifies your Tor relay on the network during its whole lifetime.
Other keys in the /var/lib/tor/keys directory change periodically.
In case you have to restore your relay on a new machine, you should need backups of the following files:
/etc/tor/tor-relay
/var/lib/tor-relay/fingerprint
/var/lib/tor-relay/keys/secret_id_key
You should backup those files on a secure storage device along with other server-keys.
Daily Backup
Make sure the following directories are included in your daily backup set:
/etc/tor
/var/lib/tor-relay